Rodent Proofing Your Home Before Winter: A Snohomish County Survival Guide
Quick Answer: September and October Are the Window
If you live in Snohomish County and you’re going to rodent proof your home, do it now. September and October are the critical months, the narrow window between when rodents start scouting for winter shelter and when they’ve already moved in.
Once temperatures drop below 50 degrees F consistently at night, typically mid-to-late October in the Puget Sound region, rats and mice are actively seeking entry. By November, they’re nesting. By December, they’re breeding. And by January, you’re dealing with a full colony, contaminated insulation, and repair costs that are 5 to 10 times what prevention would have cost.
Key takeaway: Preventive rodent proofing costs $800 to $2,500. Remediation after an infestation runs $4,000 to $12,000. The math is simple, and the window to choose the cheaper option is right now.
Why Snohomish County Has a Rodent Problem
Snohomish County isn’t unique in having rodents, but the region’s combination of climate, housing stock, and geography creates conditions that keep the population thriving:
| Factor | Snohomish County Reality | Why It Matters |
|---|---|---|
| Climate | Mild winters (rarely below 25 degrees F) | No hard freeze to reduce population |
| Rainfall | 35-45 inches per year | Drives rodents to seek dry shelter |
| Tree canopy | Dense in Mountlake Terrace, Edmonds, Bothell | Roof rats travel via branches to rooftops |
| Housing stock | Heavy 1960s-1980s construction | Aging materials create more entry points |
| Proximity to water | Creeks, rivers, Puget Sound shoreline | Norway rats thrive near water sources |
| Rural-urban interface | Farmland borders residential areas | Seasonal rodent migration toward homes |
Communities like Mountlake Terrace, Lynnwood, Edmonds, and Bothell sit right in the zone where suburban neighborhoods meet mature tree cover and water features. Roof rats use those tree canopies as highways, and Norway rats follow the drainage corridors. When fall arrives, both species shift their focus from outdoor food sources to the warmth and shelter of residential structures.
Know Your Enemy: Norway Rats vs. Roof Rats
Snohomish County has both major rat species, and they behave very differently. Knowing which one you’re dealing with determines where to focus your proofing efforts.
| Feature | Norway Rat | Roof Rat |
|---|---|---|
| Size | 10-12 inches body, heavy build | 6-8 inches body, slender |
| Color | Brown or gray, lighter belly | Dark brown or black, gray belly |
| Habitat | Ground level, crawl spaces, basements | Upper levels, attics, wall voids |
| Entry method | Burrows, foundation gaps, ground-level openings | Climbs trees, power lines, fences to reach roofline |
| Common in | Near water, lower-lying neighborhoods | Neighborhoods with mature trees |
| Droppings | Blunt ends, 3/4 inch | Pointed ends, 1/2 inch |
In Mountlake Terrace and Edmonds, roof rats are especially common due to the heavy tree canopy. In Lynnwood and Bothell, we see more Norway rats, particularly in neighborhoods near streams, wetlands, and commercial areas. Many homes in Snohomish County have both species, Norway rats in the crawl space and roof rats in the attic.
The Entry Point Checklist
Rodents only need a surprisingly small gap to get inside. Here’s every common entry point to inspect, organized by area of the home:
Foundation and Ground Level (Norway Rats)
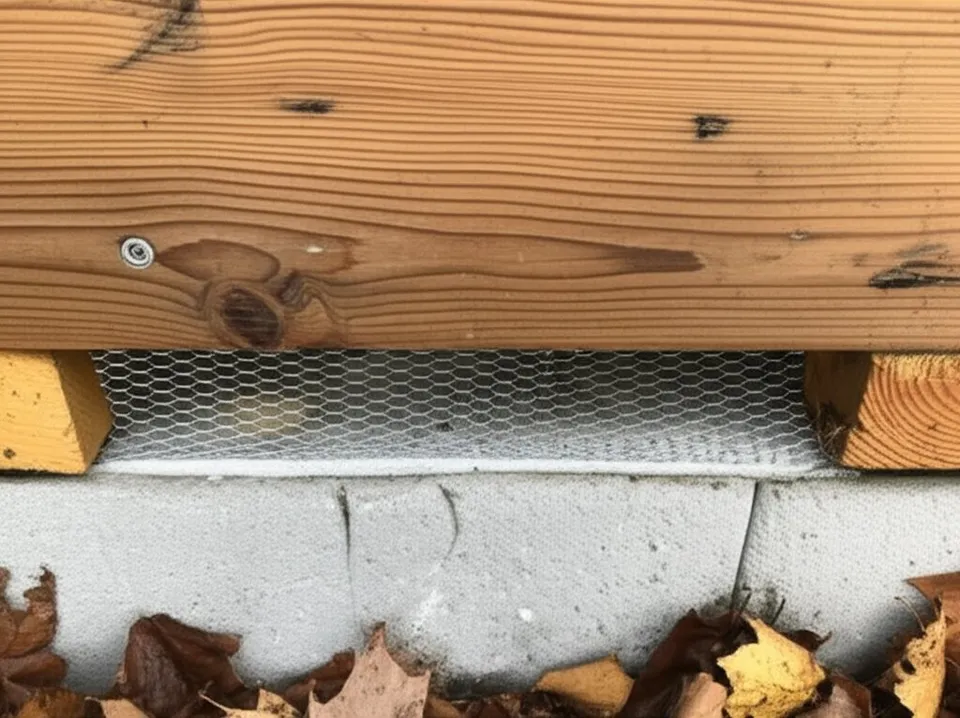
- Foundation vent screens: Check for rust, holes, or missing screens. This is the most common entry point for Norway rats in Snohomish County.
- Utility penetrations: Gas lines, water lines, and electrical conduit entering through the foundation often have unsealed gaps around them.
- Foundation cracks: Any crack wider than 1/4 inch is a potential mouse entry point. Wider than 1/2 inch and rats can enter.
- Crawl space access door: Gaps around or beneath the access door are a common oversight.
- Where siding meets the foundation: The junction between siding material and the foundation wall often has small gaps that widen over time.
- Garage door seals: Worn or damaged bottom seals create easy ground-level access.
Roofline and Upper Level (Roof Rats)
- Roof-to-siding junction: The transition where the roof meets the siding often has small gaps, especially on older homes.
- Soffit vents: Damaged or uncovered soffit vents are an open door for roof rats.
- Gable vents: Deteriorated screening or damaged vent covers.
- Plumbing vents through the roof: The rubber boot around vent pipes degrades over time, creating gaps.
- Roof flashing: Gaps around chimney flashing, skylight flashing, and valley flashing.
- Fascia board deterioration: Rotting or damaged fascia boards allow rats to chew their way behind the gutter line.
- Tree branches within 6 feet of the roof: This isn’t an entry point itself, but it’s the highway that gets roof rats to your roofline.
Pro tip: When inspecting for entry points, look for grease marks (dark rub marks from body oils) around gaps and along edges. These tell you exactly where rodents are traveling, even if you haven’t spotted the animals themselves.
DIY Prevention Steps You Can Take This Weekend
You don’t need a contractor for everything. Here are the steps any homeowner can take to reduce the risk:
Exterior Steps
- Trim all tree branches back at least 6 feet from your roofline. This is the single most impactful thing you can do for roof rat prevention. If branches overhang or touch the roof, roof rats will use them.
- Secure garbage cans with tight-fitting lids. Open or loose-fitting garbage cans are a food source that attracts rodents to your property.
- Remove fallen fruit and bird feeders. Both are powerful attractants. If you want bird feeders, use squirrel-proof models and clean up fallen seed daily.
- Stack firewood at least 20 feet from the house and elevate it off the ground. Woodpiles against the house are prime nesting cover.
- Clear vegetation and debris from the foundation perimeter. Rodents use ground cover to approach the house without being exposed to predators.
Sealing Steps (Ground Level)
- Replace damaged foundation vent screens with 1/4-inch galvanized hardware cloth.
- Seal gaps around utility penetrations with steel wool stuffed into the gap and covered with exterior-grade caulk or concrete patch.
- Fill foundation cracks with hydraulic cement for anything wider than 1/4 inch.
- Install a sweep on the garage door if the bottom seal is worn.
- Check and repair the crawl space access door seal.
What NOT to Do
- Don’t use expanding foam by itself. Rats chew through it within hours. Any foam sealant must be backed with steel wool or hardware cloth.
- Don’t use poison bait as prevention. Bait attracts rodents to your property. It should only be used as part of an active removal plan, and even then, it creates secondary problems when poisoned rodents die inside walls.
- Don’t seal entry points if rodents are already inside. Trapping them inside creates a worse situation. If there’s active infestation, the sequence is: trap first, then seal.
When You Need Professional Exclusion
DIY prevention handles the easy, accessible entry points. But a complete rodent exclusion requires inspecting and sealing the full building envelope, including areas that most homeowners can’t safely access:
Call a professional when:
- You’ve found rodent droppings or heard activity and need a full inspection
- Entry points are on the roof, behind gutters, or at upper-story soffits
- Your home has multiple stories with complex rooflines
- You’ve tried sealing gaps yourself but rodents are still getting in
- There’s evidence of an active colony (heavy droppings, nesting material, gnaw marks)
Professional rodent exclusion includes a complete perimeter inspection from foundation to ridgeline, sealing every identified entry point with steel mesh and metal flashing, and a follow-up check to confirm the seal is holding. On a typical Snohomish County home, we find 8 to 20 entry points, and most homeowners catch fewer than half of them on their own.
The Real Cost: Prevention vs. Remediation
This is where the decision gets clear. Here’s what it costs to prevent the problem versus what it costs to fix it after rodents have been living in your home for a few months:
| Scenario | What’s Involved | Cost Range |
|---|---|---|
| Preventive exclusion (no current infestation) | Full inspection + seal all entry points | $800-$2,500 |
| Active infestation (caught early, 1-2 months) | Trapping + exclusion + light cleanup | $2,500-$5,000 |
| Established colony (3-6 months) | Trapping + exclusion + full attic cleanup + insulation replacement | $4,000-$10,000 |
| Long-term infestation (6+ months) | Everything above + possible mold remediation + structural repair | $8,000-$15,000+ |
The pattern is consistent: every month you wait, the cost roughly doubles. A colony that’s been active for six months has contaminated far more insulation, chewed more wiring, and produced far more droppings than one caught in the first few weeks.
For a detailed breakdown of remediation costs, see our guide on rodent damage attic repair costs.
The Damage Timeline: What Happens Month by Month
Understanding how quickly a rodent problem escalates helps explain why prevention is so much cheaper than cure:
| Timeline | What’s Happening | Damage Level |
|---|---|---|
| Week 1-2 | 1-2 rats scouting, establishing nest | Minimal |
| Month 1 | Colony of 4-8, nesting in insulation | Light contamination |
| Month 2-3 | First litter born (8-12 pups), tunneling through insulation | Moderate contamination, R-value degradation |
| Month 4-6 | 20-40+ rats, second generation breeding | Heavy contamination, significant insulation damage |
| Month 6-12 | 50-100+ rats, wiring damage, structural gnawing | Severe contamination, fire risk, possible mold |
A single pair of rats can produce 5 to 10 litters per year, with 6 to 12 pups per litter. Those offspring reach breeding age in just 5 weeks. The math compounds fast.
Pro tip from Sadeq: We see the heaviest call volume for rodent problems in December and January, after homeowners have been hearing noises for a month or two and finally decide to act. By then, the colony is well-established and the cleanup is extensive. The homeowners who call us in September for preventive exclusion save thousands and avoid the stress entirely.
Snohomish County Neighborhood Guide
Rodent pressure varies across Snohomish County based on tree cover, proximity to water, and housing age:
- Mountlake Terrace: Heavy roof rat activity due to mature tree canopy. Focus on roofline entry points and branch trimming.
- Lynnwood: Mix of roof rats and Norway rats. 1960s-1980s housing stock has more deteriorated entry points. Foundation vents are a priority.
- Edmonds: Roof rats from tree cover, Norway rats near the waterfront and ravines. Homes on slopes need extra attention to downhill foundation walls.
- Bothell: Significant Norway rat population near the Sammamish River corridor. Crawl space entry points are the primary concern.
- Everett: Port and industrial areas drive Norway rat populations inland into adjacent residential neighborhoods.
- Snohomish and Monroe: Rural-suburban interface means field mice and Norway rats migrate from agricultural land toward homes in fall.
Your September-October Action Plan
Here’s the timeline for getting ahead of the problem:
Week 1 (Early September):
- Trim tree branches back 6+ feet from roofline
- Clear vegetation and debris from foundation perimeter
- Remove outdoor food sources (fallen fruit, unsecured garbage, bird feeders)
Week 2:
- Inspect entire foundation perimeter for gaps and damaged vent screens
- Seal ground-level entry points with steel wool and caulk
- Replace damaged vent screens with hardware cloth
Week 3:
- If comfortable on a ladder, inspect soffit line, fascia boards, and gutter line for gaps
- Check garage door seals and crawl space access door
Week 4 (Early October):
- Schedule professional inspection if you found entry points you can’t reach or seal yourself
- Set monitoring traps in attic and crawl space to detect early activity
If you complete this plan by mid-October, you’ve dramatically reduced your risk of a winter infestation. If you find evidence of existing activity at any point, skip ahead to calling a professional. Early action is everything.
Don’t Wait Until You Hear Them
The worst time to deal with rodents is after they’ve moved in. The best time is right now, before temperatures drop and the fall migration to shelter begins.
Request your free estimate for preventive rodent exclusion. We’ll inspect your entire home perimeter from foundation to roofline, identify every entry point, and seal them with materials rodents cannot chew through. We handle rodent proofing, attic cleanup if contamination is already present, and insulation replacement as one coordinated project across Snohomish County and King County.
The September window is short. Let’s use it.

"October is the busiest month for rodent calls in Snohomish County. The Norway rats start moving inside as soon as nighttime temperatures drop into the 40s. If you're going to do preventive exclusion, September is the window. Once they're inside, the job gets bigger and more expensive."
Sadeq, Owner
"The difference between prevention and remediation is usually about three to one on cost. A full exclusion with sealing in September runs $800 to $2,000. If you wait until December and the rats have been nesting for two months, you're looking at exclusion plus cleanup plus insulation replacement — $4,000 to $8,000."
Sadeq, Owner
Frequently Asked Questions
When do rodents start moving into homes in Snohomish County?
Rodent activity around homes increases significantly starting in late September and peaks in October and November as temperatures drop below 50 degrees F at night. Rats and mice seek warm, sheltered nesting sites before breeding season. By the time you hear them in November or December, they have already established a colony. The ideal prevention window is September through early October.
What types of rodents are common in Snohomish County?
The two most common species are Norway rats and roof rats. Norway rats are larger, ground-dwelling rodents that enter through crawl spaces, foundation gaps, and basement openings. Roof rats are agile climbers that access homes from above via tree branches, power lines, and rooftop gaps. Both species are well-established throughout Snohomish County, from Mountlake Terrace and Lynnwood to Edmonds and Bothell.
How small of a gap can a rat fit through?
A Norway rat can squeeze through a gap as small as half an inch, roughly the diameter of a quarter. Mice can fit through openings as small as a quarter inch, about the width of a pencil. This means virtually any unsealed gap around utility lines, foundation vents, pipe penetrations, or damaged siding is a potential entry point.
How much does rodent proofing cost in Snohomish County?
Preventive rodent proofing for a typical Snohomish County home costs between $800 and $2,500, depending on the number of entry points and accessibility. This includes a full inspection and sealing all identified gaps with steel mesh, metal flashing, and commercial-grade sealant. Compare that to the cost of remediation after an infestation, which typically runs $4,000 to $12,000 including exclusion, cleanup, and insulation replacement.
Can I rodent proof my home myself?
You can handle some basic prevention steps yourself, such as trimming tree branches, securing garbage cans, sealing visible ground-level gaps with steel wool and caulk, and replacing damaged vent screens. However, a thorough exclusion requires inspecting the entire building envelope from foundation to roofline, which means getting on the roof and into the attic. Most homeowners miss entry points at the roofline, soffit junctions, and behind gutters, which is where professional exclusion becomes necessary.
What happens if I wait until I hear rodents to take action?
By the time you hear scratching or scurrying in your walls or attic, rodents have already established a nesting site and are likely breeding. A single pair of rats can produce up to 1,500 descendants in a year. At that point, you need trapping, exclusion, contamination cleanup, and likely insulation replacement. What would have cost $800 to $2,500 in prevention can quickly become a $4,000 to $12,000 remediation project.